Saturday, November 28, 2009

Cooking the Turkey

When it's done in the brine, take it out, rinse it off and pat it dry with a paper towel.


Here it is, ready to go into the roasting pan.


I pulled it out of the oven at about 155 degrees and let it carryover cook, tented with foil, to 165.


The finished product. Note the skin looks a little "cajun" in some areas but, trust me, it was delicious!


I hope you all had a great Thanksgiving!

Wednesday, November 25, 2009

Preparing the Turkey

The brine is ready, it's time to add the turkey.


A quick trip over to Maple Lawn Farms to pick-up a bird. This 23.5 pounder was walking around this morning! It doesn't get much fresher than that.


They wrapped the turkey in butcher paper. Open it up, stuff it with orange quarters, and get it into the brine. It's important to keep it COLD so I'll put the brine into a cooler filled with plenty of ice. Need to watch it for the next 24 hours or so to be sure it stays cold and add ice as necessary. Once in the brine, I'll rotate the bird once or twice. In the past, I've used large plastic bags to hold the brine and turkey. This year, I'm trying a bucket and so far I'm very pleased. Much easier to manage, cleaner, and I don't have to worry about it splitting open and spilling the brine all over my kitchen when I move it around.


Here's what will happen once I'm ready to cook the turkey:


  1. Preheat oven to 500 degrees
  2. Remove the turkey from the brine, rinse it, and pat dry with paper towels
  3. Line roasting pan with carrots, celery, and onions. Add chicken broth.
  4. Fill the turkey's cavity with garlic, sage, thyme, parsley, and onion
  5. Put turkey in the pan, breast side down for now
  6. Brush turkey with butter, sprinkle with salt and pepper
  7. Bake at 500 for 30 minutes
After 30 minutes at 500 degrees:

  1. Reduce oven to 350 degrees
  2. Flip the turkey over, breast side up
  3. Cook to an internal temperature of about 155
  4. Don't worry, it'll get to 165 as it rests. This should also prevent you from carving it too soon.

As it cooks, I'll be sure to watch the skin so that it doesn't get too dark. If I feel that it will, I'll tent the turkey with some aluminum foil. One of the most important pieces of the cooking process is to use a leave-in thermometer. This will let you keep the oven closed which keeps the heat in. There's no need to baste the turkey as it cooks. My motto: "always brine, never open the oven."


As for carving? I'm planning on trying something new this year but we'll ask Alton Brown for some tips on how. Watch this video to see how.


With the turkey, we'll have a bunch of the usual sides, and plenty of beverage options. Personally, I'll be having a Toad Hollow Chardonnay.


I hope you and your family have a happy and safe Thanksgiving!

Monday, November 23, 2009

Turkey Time

It's not Thanksgiving yet but to properly prepare for my turkey it's time to start mixing up the brine.

Here's my grocery list:
  • apple cider
  • kosher salt
  • sugar
  • fresh ginger
  • black pepper
  • all spice
  • cloves
  • bay leaves

While at the store, I noticed that they're selling Egg Nog. Feels a little early for nog but I've got some Jameson's at home so why not?


Start the mixing:


Step 1 - Jameson's and Egg Nog in the shaker. Serve over ice with a bit of nutmeg. Looks like my wife already has a cup of tea but the nog shouldn't be a hard sell.


Step 2 - Get all the other ingredients going on the stove long enough to let the sugar and salt dissolve and make the house smell like Thanksgiving.


The brine will have plenty of time to cool. Picking up the turkey from Maple Lawn Farms tomorrow.

Monday, September 14, 2009

Just the domain

I've done this a couple of times before but found myself having to dig through docs to remember how so thought I'd put up a post for future reference.

I wanted to group some users by their email domain for a query I was running in my PostgreSQL database. I have a users table with an email column. Here's a query I ran:


select count(*) as users,
substring(email from (position('@' in email))+1) as "domain"
from users
group by domain
order by users desc
limit 10;


users | domain
-------+---------------
XXXXX | yahoo.com
XXXXX | gmail.com
XXXXX | hotmail.com
XXXXX | aol.com
XXXXX | comcast.net
XXXXX | msn.com
XXXXX | sbcglobal.net
XXXXX | live.com
XXXXX | verizon.net
XXXXX | ymail.com


This allows me to select the email domain from the email column. Pretty handy.

Wednesday, June 24, 2009

TweetDeck - How to follow multiple accounts

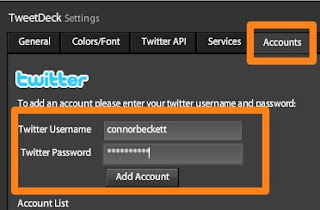
With the latest version of TweetDeck, you can now easily follow many accounts at one time. Here's a quick step-by-step to show you how.
  • Click the Add more acccounts link (or Accounts tab in the Settings screen)
  • Enter the account credentials (Username and Password) then add the account and save.


  • Click the "All Friends" column to add a new column.
  • Using the drop-down arrow, select the account you want to add the column for.

One thing to watch out for, when posting a tweet pay special attention to which account(s) the tweet will be "From". You might not want to post as multiple personalities. Just click each account to toggle it on / off.

Tuesday, April 7, 2009

SVN to git and cruisecontrol.rb

We're finally moving from svn to git.  Yesterday, I worked on upgrading our cruisecontrol.rb to monitor our git repository.  Previously, we were on svn and using cruisecontrolrb-1.2.1 so it was time to upgrade CruiseControl and migrate to git in one fell swoop.

Our team uses Unfuddle so the first step was to work with them on completing the svn git clone.

Our cruisecontrol set-up includes an apache web server in front of the cruisecontrol.rb rails application with integration to our Campfire room via a plugin.

Here are the steps I followed:

  1. Set-up a user that has read-only access to our git repository - The steps I followed here were specific to Unfuddle and included putting the public key into the Unfuddle user's personal settings.
  2. Build Cruisecontrol.rb - git clone \ git://github.com/thoughtworks/cruisecontrol.rb.git
  3. Copy the campfire plugin from OLD_CRUISE_ROOT/builder_plugins/installed/campfire_notifiter.rb to NEW_CRUISE_ROOT/lib/builder_plugins
  4. Copy .yml files from OLD_CRUISE_ROOT/config to NEW_CRUISE_ROOT/config
  5. Update my front-end apache server to point to the new cruise installation
  6. remove the .htaccess file from NEW_CRUISE_ROOT/public/.htaccess
With all the configuration complete, I'm now ready to add projects.  In the svn days, we'd always monitor trunk and the branch currently running in production.  Here's how to add the same using git:

./cruise add PROJECT_NAME --source-control git \
--repository git@our.host:repo/name.git

./cruise add PROJECT_NAME --source-control git \
--repository git@our.host:repo/name.git --branch BRANCH_NAME


Friday, March 13, 2009